Email Subcription

Friday, May 8, 2020

What is Journal Voucher Entry in SAP Business One?

Hello! Today I will explain to you- What is Journal Voucher Entry in SAP Business One?
Journal Voucher Entry is a draft stage of a Journal Entry and its procedure similar to regular Journal Entry, unlike Journal entry it will not be effected the balance of account directly . The best part of journal voucher is that to see the impact of journal voucher entries in Financial Statement by clicking "Add Journal voucher".

Let Start!

Open journal voucher document which is in Financials module.

Path: Financials--> Journal Vouchers 

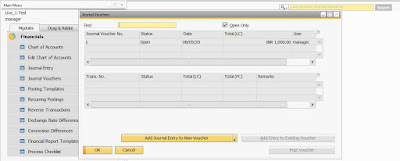
Once opened Journal Voucher document, then click on Add Journal Entry to New voucher as shown in below screenshot.


After clicking on Add Journal Entry to New voucher button, the screen appeared and then enter a your required journal entry.


Once added Journal Voucher, now you can see that general entry's effect in Profit & Loss Statement by selecting Add Journal Voucher check-box.


After checking the effect of journal entry, you can post this entry permanently by clicking on POST Voucher button.


You can also do post this voucher in Journal Vourcher Report.

Path: Financial--> Journal Voucher Report


Once you posted this journal voucher then this entry shown in Jounal Entry document.


Thursday, April 16, 2020

Auto-Numbering Check Set-up in SAP Business One

Today I will let you know about "Auto-Numbering Check Set-up" in SAP Business One.

When you are using the payment means as Check for Outgoing Payment then you need a stock of checks to print a check from printer and maintain the Check Number as well.

Here I will show you how we set-up for check printing process. First we need to set-up the Next Number of your check in House Bank Account. I entered the check number is 320003 of HDFC bank for demo purpose.

Path: Administration→Setup→Banking→House Bank Account


Add outgoing payment and after adding outgoing payment, you can see in below screenshort the check no. is not updated yet. It will be updated once we printed the check no. after confirmation. Now we go head to print the check process.

Path: Baking→Outgoing Payments→Outgoing Payments


Note: If you are not managing auto-numbering for check then you can tick on Manual Check to enter manual check number there.

After adding the Outgoing Payment, open the Check for Payment document and see details of check releated are derived from Outgoing Payment document. Here also you can see the check number is  blank and unchecked the Print on Blank Paper (details in below).

Path: Banking→Outgoing Payment→Check for Payment


Now we print the check in printer by using Document Printing. Give the range of Posting Date and Due Date in which date you did add outgoing payment and Print Check should be To be Printed

Path: Banking→Document Printing


After selecting criteria, click on OK button. The Print Check for Payment window will appear. There is finally an auto check number is seen 😄. Put the check in printer and click on Print button to print the check.


After clicking on Print button, the system message appeared- it makes sure whether Printer has the Bank's check of mentioned number is same for e.g 320003 as shown in below screenshot.


Once printed the check, now you need to confirm the check of this number if it is printed properly. You may select Print Status as per scenario. 


Note: The Check Number confirmation window appears when the option Blank Paper is unticked or unselected in House Bank Account, Print Prefrences and Check for payment as shown in below screenshort. If Blank Paper is selected/ticked then system doesn't ask for Confirmation.

For Print preference Path: Administration→System Initialisation→Print Preferences→Per document


After confirming the printed check, you can see the Check Number is reflected in Outgoing Payment and Check for Payment.


Also you can see the next number of Check is 320004 in House Bank Account which is come automatically.


Thankyou for reading my blog. Hope you like it.

Friday, April 10, 2020

Handling Scrap or Wastage items in SAP Business One

Today my topic is on the Handling Scrap or Wastage Items in Production.

You may heard the term Scrap or Wastage in manufacturing industry. In most basic sense, the scrap is left over material generated from product processing and consumption. Some organization may sale the scrap with tax in market.

SAP Business One didn't provide a default feature for scrap/wastage process, however we can do the same in work around. Here I will show how we can manage Scrap or Wastage items in SAP Business One.

First create a Scrap/Wastage item in item master. Here I created a Scrap item and its separate warehouse, so that it could manage properly.


We need to do GL determination for Scrap item- assigning general ledger for Inventory and Revenue. I am using Advance GL determination to define the rule for this. Before we need to define the GL for Inventory and Revenue. Here you can look at below screenshot


GL detemination for Scrap item-


Create a BOM for Finished Goods there we need to specify the Scrap item with negative quantity.

Regarding quanity for scrap in BOM, it depends on scenario to scenario how much scrap is generated during a particular Finished Goods to be processed. 

Here I have made a BOM as you can see in below screenshort. Components of BOM are raw-materials and total consumption is 1 kg and scrap is approx 500 gm in negative quantity. Therefore, the finished goods will be produced 950 gm and scrap will be generated 500gm in 1 kg of raw-material during Goods Receipt from Prodution. I have given issue method is manual because when we do Goods Receipt from Production that time we put actual scrap's quantity. If you want to do backflush as issue method, you can also do that. 


Now we see how generate the Scrap item during production with accounting entry. First, I created a production order of Finished Goods.


Create a document for Issue the material for the Finished Goods


Accounting entry during the issue material for production


Now we do receipt from production for the Finished Goods. Here we can see scrap is also generated while receipt the Finished Goods. You can change the quanity of scrap to actual quanity and also you can enter the cost of scrap for eg. I entered 2.4 INR per Kg.


Accounting entry during the receipt material from production with scrap item


As you see the Scrap Value shows 12 INR on debit side and its WIP account on credit side. Therefore ,scrap cost shows in variance.


When we Closed the Production Order then wip account and variance account are adjusted. Result, Raw-material cost 2275 INR is credited. FG cost 2263 INR and Scrap cost 12 INR are debited . Here you can see the same at below screenshort.


Create a A/R invoice to sale the Scrap item with Tax


Gross Profit of Scrap item as we mentioned the item cost during production.


GL entry of Revenue of Scrap Sale which is posted after saving the A/R invoice.


This is the process to handle Scrap/Wastage in SAP Business One. I hope you like it and please subscribe my Blog- SAP Business One Knowledge by enter your email id so that you will get updates when new blog is posted.


Friday, April 3, 2020

Manage Freight Charges in Purchasing Document

Today I will let you know about the Freight charges in Purchasing Document.

There are two scenarios that we can manage the freight charges on document and row level. First, the freight without inventory valuation and second is the freight with inventory valuation, if you manage perpetual inventory.

Here I explain them one by one.

Firstly we have to enable the Freight Set-up in Document Setting

Path: Administration--> Systems Initialiazation--> Document Setting--> General Tab

Check "Manage Freight in Documents" and once checked it, the Freight Setup button appeared.


Click on Freight Set-up button to define various freight charges and allocate the Freight GL under Revenue Account and Expense Account respectively.

Here I will explain about the Expense Account for purchasing document and without valuation inventory.

Allocate the Freight GL account under Expense Account as seen on screenshort below.


Now we create Goods Reciept PO with freight charges.


Goods Reciept PO in journal preview. No Journal Entry for freight is passed as the freight is without invetory valuation.


To create a A/P Invoice by using Copy From to select Goods Receipt PO.


After adding A/P Invoice, the Jounal Entry for Freight is passed.


Now we see the Freight with inventory valuation.

For this you need to check Stock/Fixed Asset in Freight Set-up as shown in below screenshot.


Select the Distribution Method  for distributing the freight amount among document rows.


Allocate the Expense Clearing Account GL in GL Account Determination.

Path: Adminstration-->Set-Up-->Financials-->G/L Determination-->G/L Determination in Inventory Tab.


Now we create Goods Reciept PO with Freight charges.


Goods Reciept PO in journal preview. GL account of Expenses Clearing Account is passed as the freight is with inventory valuation. Expenses Clearing Account  is on credit side which means Freight amount is load on Raw Material on debit side of that item.


To create a A/P Invoice by using Copy From to select Goods Receipt PO


After adding A/P Invoice, the Journal Entry of Expenses Clearing Account is on debit side to nullify this account.


 This is the process of Freight Set-up in SAP Business One, hope you like it. Thankyou to all.

Thursday, April 2, 2020

Drop-ship Warehouse in SAP Business One


Today I will let you know about Drop-ship Warehouse in SAP Business One.

Drop shipping is an order fulfillment method where store does not keep the products in stock. Instead, when a store sells a product using the drop-shipping model, it purchases the item from a third-party and then third-party shipped directly to the customer. As a result, the seller doesn’t have to handle the product directly.

I will show you in below diagram. This process is being done in one of my client.


Now how we can configure it in SAP Business One, here I will show you below:

1. Set-up Drop-Ship Warehouse

First you create a Warehouse of Drop-ship and check on the Drop-Ship checkbox. The drop-ship warehouse to be created as a Virtual Warehouse which means without holding any inventory in the warehouse.

If you wish to manage batch and serial items with the warehouse then select the Manage Serial Numbers and Batches checkbox.

Path: AdministrationàSetupàInventoryàWarehouse


2. Creating Sales Order and Purchase Order for Drop-Shipping

           Select a drop-ship warehouse while creating Sales Order.


               On Logistic Tab by-default checked the “Proc. Doc. For Drop-ship Whse Lines” when you select a drop-ship warehouse.


                Add Sales Order document. Once you added sales order document, SAP B1 system immediately open a Procurement Confirmation Wizard window for ordering the product from one of vendor.


   Automatically Purchase Order created when finished the Procurement Confirmation Wizard.


 3. Creating A/P Invoice and A/R invoice for Drop-Shipping


     Based on Purchase Order, A/P invoice is created. In-stock shows zero as inventory is not holding in this warehouse.


     Based on Sales Order, A/R invoice is created.


This is the process to be creating Drop-Ship Warehouse in SAP Business System. Thankyou.